My way of fitting out an OK
Fitting out an OK is quite a puzzle
and requires time and passion. The final result is always a compromise
between personal requirements, financial and temporal constraints and the
state of the fittings that maybe are already mounted. Some people take
their new purchase and replace everything that looks suspicious. This may
be a very money and time consuming affair, since usually it turns out that
the old fitting arrangement was not as bad as it looked like. On the other
hand there are also people always sailing with insufficient fittings who
never enjoyed the feeling of having an outhaul that really works. My philosophy
is simply:
Never change a running system!
Follow an example that works!
I think with this principle I had
my fun and kept the costs bounded.
This little essay concerns only my
OK. For any problem however there is more than one solution, some will
fit your purposes better than mine. So in any case you should take further
advice, look at other web pages, talk to experts, take photos of competitive
boats etc.
The bare necessities (and overview over
this article)
I think the following controls are the
bare minimum on any boat:
-
main
sheet and traveller system
-
centerboard
control
-
shockcord
-
outhaul
-
kicker
-
cunningham
-
halyard
Some people find an inhaul inevitably.
An ajustable toestrap is also convenient. I even have seen an ajustable
shockcord and an ajustable outhaul power cord. However, if your boat provides
what I have called the bare necessities, you will have a quite competitive
OK. To each of the necessities I devoted a small chapter. Finally I added
two chapters, one concerned with how
to mount failure free fittings
and the other with my mast bearings.
How to
mount failure free fittings
 Considerable loads may appear at certain
fittings, but since an OK is supposed to be a lightweight boat, not all
parts of it are able to cope with it. Especially not the deck, where you
will have to fix a couple of cleats and eyes. Only a few special fittings
are necessary on mast and boom, and they will be discussed in their respective
sections.
Deck fittings on an OK are usually
charged with shear stress, i.e. forces parallel to the deck. Therefore
the bolts tend to bend in the direction of the force. Since the wooden
deck is not able to carry the local loads, the bolt will make its hole
bigger and bigger, even if you have a piece of wood glued under the deck.
Therefore the deck has to be reinforced around the bolts hole.
First take a piece of spruce, cover
it entirely with epoxy resin and glue it under the deck. The epoxy
covering will control the wood humidity. Otherwise, the wood can shrink
in dry periods and the bolts get loose. Now put
the fitting exactly at the place where it is going to be and copy the circumfence
onto the deck using a filtpen. Remove any dye or varnish inside the circumfence.
Then drill holes exactly at the places where the bolts are going to be,
but the diameter approximately 5mm larger than the bolts diameter, and
depth about 5mm less than the thickness of deck plus spruce piece. This
hole shall be filled entirely with epoxy resin, reinforced with strong
additives like colloidal silica and glass bubbles. If the resin
has hardened, mount the fitting as usual, but additionally you should glue
it on the deck, and the bolt should be covered with resin as well before
it is put through the hole.
My mast
bearings
The main
sheet and traveller system
Although modern dinghies provide a lot
more sophistication than in the good old times, the main sheet is still
by far the most important control. Therefore it should work perfectly and
absolutely failure free. For further information consult Trevor Gore's
How
hard to pull the main sheet.
I have a 8mm sheet that is fixed
at the boom, runs down to the traveller, again to the boom and then through
a turnable snatch pulley at the cockpit floor right behind the centerboard
case. The pulleys at the boom and the traveller as well as the knot fixing
the sheet at the boom should be as small as possible. The OK is sailed
with so much rake that the boom is pulled down to the sheerline in
heavy weather. If your pulleys are too large, you cannot bend the mast
sufficiently. Consequently, the sheet has to be quite thin, and I think
10mm is the absolute maximum. An 8mm is even more preferrable, especially
if you can purchase one having 24 strains instead of 16 which is usual.
My traveller runs on an X-track which is mounted at the centerboard case
and at the side decks. I have a nice cutaway in the side decks to let the
traveller run freely out to the sheerline. This is very convenient when
beating through heavy waves. Letting the traveller out to the gunwhale,
the booms end is about 30-40cm off the sheerline. With the centerboard
almost half up and 70kg live weight I can sail windward even in 7 or 8
windstrength without getting overpowered too quickly.
Since the part of the sheet running
down to the cockpit floor has the tendency to pull the traveller inwards,
it is necessary to bend down the track in the middle. To control the traveller
position I have one control on each side running from under the side deck
to a pulley at the traveller cart and back to a small cleat mounted at
the fore cockpit bulkhead.
I think a ball bearing traveller
is not necessary. Even the old water pipe travellers don't need to be replaced.
I have a simple X-track traveller without ball bearings and never had any
problems to control it.
To fix the sheet I have a Curry cleat
on each side mounted right before the bulkhead on the deck close to the
sheerline. So the whole side deck is free for sitting. Be careful where
mounting the cleat. It may happen that the part of the sheet running down
into the cockpit gets accidentally into the cleat in lee, especially on
reachs or runs. You cannot pull the sheet anymore and capsize luffwards.
The centerboard
control
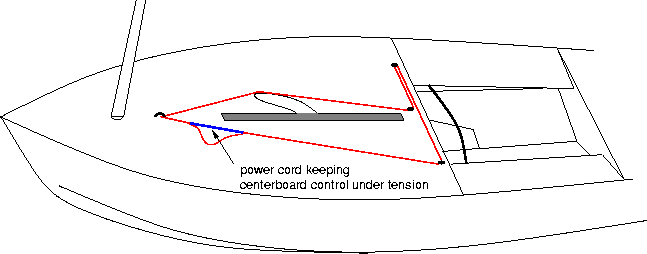
I have the very common endless system:
The control runs from the centerboard head (where a small eye is mounted)
backwards through a deck mounted pulley right behind the centerboard slot,
then to port side through a deck mounted pulley, then to the starboard
side, again through a deck mounted pulley and then through an eye mounted
midships 45cm forward of the centerboard slot to come back to the head
of the centerboard (see drawing). I use a 15cm piece of power cord keeping
the control under tension. There will be a lot of friction in the system,
which I consider desireful, since the centerboard cannot flip into the
centerboard case when the boat is capsized.
There is also another system in use:
The centerboard is held down by a control fixed at the head of the centerboard
and kept in a cleat right behind the centerboard slot. A power cord takes
the centerboard up if the control is released. This system I think has
a couple of drawbacks. First, if the boat runs aground, both the cleat
and the centerboard may be damaged. Second, the centerboard cannot be ajusted
while hiking out, especially not when the power cord is insufficient to
take the centerboard up, e.g. while beating. Finally, if you manage to
capsize with the centerboard completely up (in the centerboard case) you
will have to dive under your boat, while the endless system is accessible
more easily.
The shockcord
This is a 5-6m long power cord running
from point at the boom (usually at the main sheet fitting) passing the
mast at one side through a pulley at the towing eye and then back to the
boom passing the mast at the other side. Some people even have small hooks
at the sheerline keeping the power cord away from the mast. If put under
tension, this power cord will keep the boom outwards. The reason is that
if the boom is midships the cord is longer than if the boom swings out.
Since the cord looses tension quite fastly if it is permanently under stress,
it should be removable easily. I have hooks at the ends. Furthermore, this
device is only needed in light wind conditions. It is very common to have
the pulley at the towing eye and the hooks at the main sheet fitting. Doing
it the other way round a shorter part of the cord has to slip along the
mast when the boom turns. However, the disadvantage is that you cannot
use the power cord as a "counter sheet" taking the boom out if you pull
it.
The outhaul
The outhaul system has to meet the following requirements. It has to provide
a purchase of at least 4:1 (mine has 8:1), when fully released, the sail
shall be 10-15cm forward of the measurement band, you need to use it from
both sides while hiking, and last but not least, the whole construction
shall not get in conflict with your centerboard while tacking or jybing.
The first step on the way to a good outhaul is to mount a ball bearing
sheave at the very end of the boom. These sheaves usually consist of two
concentric disks, an outer one bearing the rope and an inner one which
is slightly thicker than the outer one. So if put tightly between two plane
surfaces, the outer weel can run freely. The inner weel has a hole in the
center bearing the bolt that keeps the whole thing in position. To mount
the sheave, first you cut a small wedge off the end of the boom (see drawing,
but be careful, since forward of the measurement band the boom has to be
70mm plus minus 20mm). The idea now is to cast a plastic mount for the
sheave. Using tape and small plastic sheets (old credit cards or whatever)
build a small mould and then pour epoxy resin, probably with some appropriate
additives, into the mould. If you have a separate sail track, cut off the
part behind the measurement band. If your sail track is part of the boom
profile, fill it up with resin as well. Now drill the hole bearing the
bolt. It should be about 3-4cm behind the measurement band and 1cm down
from the top of the boom (sail track). Then, using drill and jig saw, cut
a slit into the plastic block from behind, a little too close for the sheave.
The rest should be done using a file. Both sides of the slit have to be
plan and parallel. The bolt (a small pipe is also appropriate) should be
secured using e.g. a drop of epoxy resin.
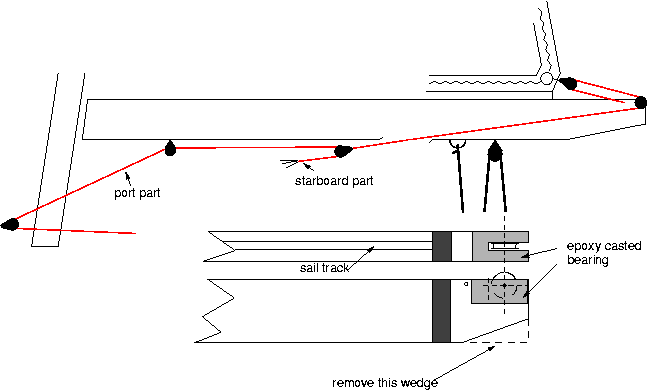 Now take again drill and file and cut a small slit into the bottom of your
boom, about 4cm long, 0.5cm wide and right forward of the main sheet fittings.
Finally drill a small hole into each side of your boom, approximately 40cm
behind the mast (if there is not already something to fix two small pulleys).
Now take 3-4mm dyneema and fix it at the very end of your boom, thread
it through a small pulley at the bottom of your leech, back to the end
of your boom and, using the newly fitted sheave, into the boom and through
the outlet at the main sheet fitting, where it should end in a pulley.
Here the rope is parted, with both parts running forward to the deck pulley
and then to the bulkhead cleat. To keep the two parts clear from the centerboard
head, we need the two pulleys at the fore part of the boom.
This ensemble yields a purchase of 4:1. To get 8:1, you need a further
pulley hidden in the boom, right after the sheave. I even have two pulleys
in the boom and none at the sail. It is a little puzzling but possible.
You should consider this if your boom is rather short. I think a 8:1 purchase
is necessary to control the outhaul if the mainsheet (or the kicker) is
under full tension. Furthermore, I have a power cord supposed to take the
outhaul forward if I release the control. This, however, works only if
I release the sheet a little. Maybe this can be improved.
The kicker (boomvang)
The kicker is maybe the most difficult device. It should yield a purchase
of at least 24:1, be ajustable on reachs and runs and fit into the small
clearance between boom, deck and mast. I have the entirely self made system
depicted here.
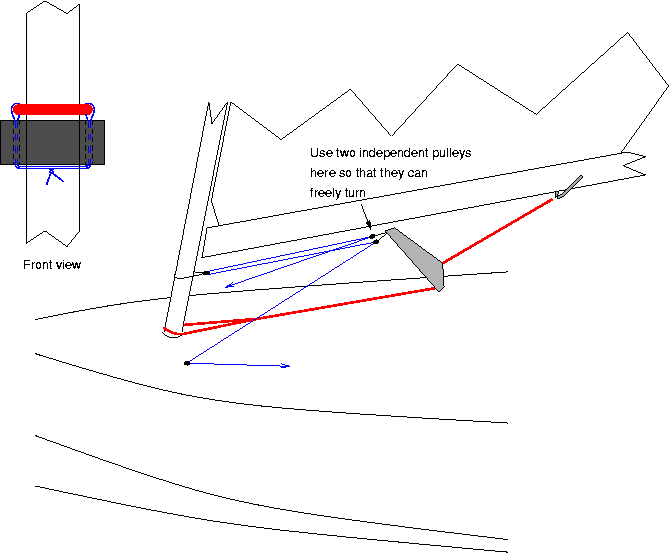
I think the drawings are more or less self explanatory. The boom fitting
is a U-shaped stainless steel band which is two times throughbolted. I
think a fitting screwed into the track at the bottom of the boom is not
sufficient to cope with the loads! The leaver is also stainless steel,
but aluminium alloy will also do the job. To adjust the whole system, first
install the rope around the mast. It is kept down by two small ropes thread
through holes in the mast ring or even, as I did it, between the mast and
the ring. NEVER drill any holes into the front side of your mast, since
this will shorten its lifetime enormously. Then adjust the blue tackle
so that if it is fully released the following requirements are met:
-
The leaver should be in a position yielding a reasonable purchase
-
The whole rig should already be a little under tension, i.e. the mast should
already bend a little.
Then before jybbing or tacking you only need to take the boomvang control
out of the cleat and let it go, and your sail will not "screw up". Since
in heavy weather more tension is needed while jybbing, the part running
from the leaver to the boom is fixed only with a knot easy to untie, so
that I can adjust it at the shore.
This system is widely used by other sailors as well, e.g. by Karsten
Hitz (world champion 2000 and 2001)
The cunningham
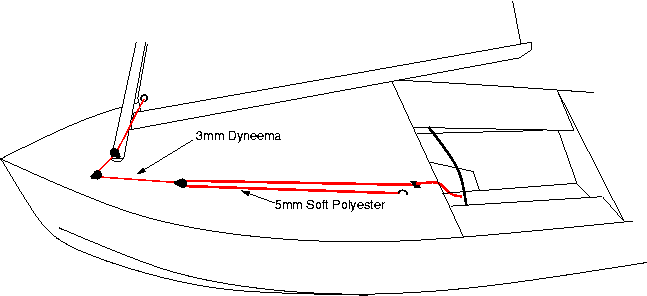 I think the cunningham should have a purchase of 4:1 and be accesible on
both sides while hiking out. For long time I had a very simple 2:1 ocunningham,
but it was really tough to make the last 2cm while hiking out. Now I have
the 4:1 system presented in the drawing. For the part running through the
cunningham hole you should use very slippy 3mm dyneema, for the other parts
something a little more handy. Using the cunningham seems to have become
a little out of fashion, and people use to sail with very much wrinkles
in the luff. I think having a new sail it is correct to use the cunningham
only on beats and only to avoid large wrinkles. However, if your sail is
older or the luff power cord has large tension, you will need a stronger
cunningham.
The halyard
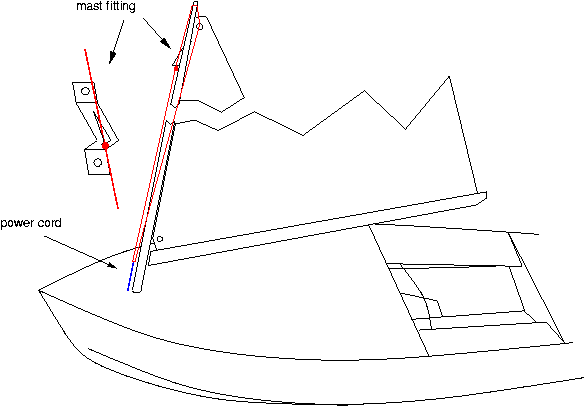 There is not much to say about it, exept for a nice way to avoid all the
spagetti on your deck when the sail is hoisted, and this is to take the
famous paternoster system. Take a halyard that is twice as long as your
mast minus about 50cm. Thread it through the sheave on top of your mast
and knot both ends to a shackle. Now attach the shackle to your sail and
hoist it. A short power cord with a hook keeps the halyard from swinging
around. No parts of the halyard will get twisted with your overdeck controls.
To fix the halyard, I strongly recommend the common system of hooking a
small knot on the halyard into a simple fitting at the front of the mast
approx. 15cm down from the top sheave. Only the few centimeters between
the sail head and the knot have to cope with the full luff tension. I recommend
3mm dyneema or kevlar here. The rest of your 10m halyard can be a 2mm thread.


